Showing posts with label Types of embroidery Stitches. Show all posts

Wednesday, May 20, 2009

Procedure of doing buttonhole stitch embroidery .

procedure of doing buttonhole stitch.

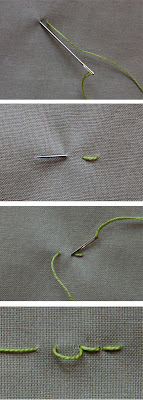
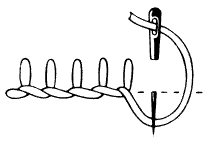
Following is the procedure of doing buttonhole stitch. Hold the thread along the top edge of the material, with the end pointing in the direction you are going to sew. Make a loop with the top of the loop pointing upward. Inserting the needle through the loop, then into the fabric from the wrong side and then through the large loop left on the right side of the material. Tighten your stitch, keeping the purl on top by see-sawing the thread and using your fingernail. The additional stitches are created by arching the thread over the right side opening of the buttonhole in the direction you are sewing, then looping down and back around in the opposite direction your are sewing, through the loop at the top, then through the material from the wrong side about 1/16th of an inch from the last stitch, through the large loop on the right side and then tightening as before. Continue doing this all the way around the buttonhole until done that’s how the buttonhole stitch embroidery is done.

Tuesday, May 19, 2009

Procedure for looped embroidery stitches

procedure for looped embroidery stitches


Following is the procedure for looped embroidery stitches. Grasp the yarn with your left hand and, with your righprocedure for looped embroidery stitchest hand, procedure for looped embroidery stitcheswrap the yarn clockwise around your left index finger to make a loop. Insert the hook into the stitch so there are two loops on the hook. Rotate the hook clockwise in the opposite direction from the way you usually would so it goes over the yarn. Now pass the hook behind the yarn held by your left index finger. Catch both strands with the hook, and pull them both through the stitch. You should now have 3 loops on your hook then pull the strand through all loops on the hook. This is a more secured and slightly stiffer version of the traditional loop embroidery stitch.

Saturday, May 16, 2009

Procedure of doing chain stitch embroidery

Procedure of doing chain stitch embroidery

Following is the procedure of doing chain stitch.embroidery. Bring the threaded needle from the back side of the fabric to the front of the fabric. Reinsert the needle into the top side of the fabric where it came out of the fabric, pointing out the back side of the fabric. Bring the needle point back up through the right side of the fabric a short distance from where the needle went into the fabric. The distance is a variable which depends on the look you are trying to create. Wrap the thread around the point of the needle as shown in the photo, so that the needle will come through a loop of thread. Pull the needle through the fabric and loop, maintaining the thread loop by not pulling the thread overly tight. To continue chain stitching, insert the needle where it came out of the fabric, pointing down to the wrong side of the fabric. Bring the point of the needle back out of the fabric the same distance a you did the first stitch. Loop the thread around the needle point. Pull the needle all the way through the fabric, maintaining the loop by not pulling the thread too tightly. Repeat until you have sewn the desired amount of chain stitches.

Friday, May 15, 2009

Procedure of doing cross stitch embroidery

procedure of doing cross stitch embroidery

Following is the procedure of doing cross stitch embroidery, bring the needle through on the lower right and take it through to the back one block up and one block to the left, bringing it through to the front again one block down to form a half cross. Continue in this way to the end of the row and then complete the upper section of the cross. Cross stitch can be worked from right to left or from left to right, but it is important that the upper half of each cross lies in one direction.

Thursday, May 14, 2009

Procedure of doing back stitch embroidery

 back stitch embroidery

Following is the procedure of doing back stitch. Bring the needle and thread from the back to the front of the fabric. Put the needle down through the fabric about 1/8-inch away from where you started (For right-handers, it may feel more natural to move to the left; left-handers may prefer the right).Bring the needle up approximately 1/8-inch away from where you went down. Pull the thread through. Put the needle back down in the same spot you did before, taking a backstitch.

Tuesday, May 12, 2009

Looped stiitch


Looped embroidery Stitches are also called "Pile embroidery Stitches”. These embroidery stitches create a texture which gives the 3-D look. The mound surface is created by the loops contained in the stitches. Some stitches remain with the loops intact and some require the loops be cut. Usually looped embroidery stitches are generally used in rug making and they may also be used in any needlepoint project that requires a 3-D or mound look. Some of the more interesting looped embroidery stitches include the loop stitch, the shell stitch and the velvet stitch.

Monday, May 11, 2009

Sicilian drawn thread stitch

Sicilian drawn-thread embroidery stitch

Sicilian drawn-thread embroidery stitch is one of the earliest and most ancient forms of open work embroidery came from the countries having borders with the Mediterranean Sea. Later this dawn work was introduced into Greece, Italy, Russia, Germany and Spain under the names PUNTO TIRATO (threads drawn one way) and PUNTO TAGLIATO (threads drawn both ways). Towards the end of the 16th century, the art of embroidering on linen was taken up in England by members of the Royal Household, who being clever at lace making, introduced lace stitches intermingled with drawn thread work to enrich their clothes and household linen. Elizabethan portraits show spectacular ruffs decorated with drawn thread work. The embroidery of the 16th Century had such a large number of threads cut and withdrawn that they were strengthened and decorated with darning and needle weaving, and with threads added diagonally and in curves which were held in place with bars. In 19th and early 20th centuries an enormous quantity of drawn thread work was produced on linen and cotton to decorate bed and table linen. This embroidery stitch is used for the decoration of lingerie, handkerchiefs, sheets, tray cloths and tea cloths, towels, nightdress cases and other household fundamentals.

Saturday, May 9, 2009

Palestrina Stitch

The Palestrina embroidery stitch is also known by many other names just like tied coral stitch, Smyrna stitch, double knot stitch. The Palestrina is a common embroidery pattern observed in Italy and many Italian types of embroidery are composed of the Palestrina stitch. The Palestrina embroidery stitch is characterized by a kind of knotted line formed by the thread and it is significant to note that the use of this stitching technique is not confined to even-weave fabrics but on the contrary it can be used on a variety of fabrics. The designs of the Palestrina embroidery stitch work are in the form of a line and are commonly used for bordering purposes. The knotted line effect is the most important and striking feature of the Palestrina embroidery stitch and while threads of different kinds and quality can be used, the best option is to use the pearl cotton threads which are twisted threads and are able to produce the knotted effect perfectly. It is interesting to notice that all the knots need to be placed at equal distances from each other and from a distance they seem to be arranged in a linear fashion following a curvature. There can be two major kinds of Palestrina embroidery stitch. If the lines above the knots enlarge upwards it is known as Long Armed Palestrina embroidery stitch while if the lines below the knot moves downwards it is called Long Legged Palestrina embroidery stitch.

Friday, May 8, 2009

Smocking Stitch

Smocking Stitch

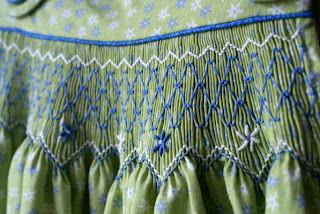
Smocking stitch is an embroidery technique used to gather fabric so that it can stretch. Before the introduction of elastic, smocking was commonly used in cuffs, bodices, and necklines in garments where buttons were undesirable. Smocking developed in England and has been practiced since the Middle Ages and is unusual among embroidery methods in that it was often worn by laborers. Other major embroidery styles are purely decorative and represented status symbols. Smocking was practical for garments to be both form fitting and flexible, hence its name derives from smock a farmer's work shirt. Smocking was used most extensively in the eighteenth and nineteenth centuries.

Thursday, May 7, 2009

Cross Stitch

cross stitch

Cross stitch is one of the oldest forms of embroidery and can be found all over the world. Many folk museums show examples of clothing decorated with cross stitch, especially from continental Europe and Asia. Two-dimensional cross stitch in floral and geometric patterns, usually worked in black and red cotton floss on linen, is characteristic of folk embroidery in Eastern and Central Europe. Multi colored, shaded, painting like patterns as we know them today are a recent development, deriving from similar shaded patterns of Berlin wool work of the mid-nineteenth century. Traditionally, cross stitch was used to embellish items like dishcloths, household linens, and doilies (only a small portion of which would actually be embroidered, such as a border). Although there are many embroiders who still employ it in this fashion, especially in Europe, it is now increasingly popular to simply embroider pieces of fabric and hang them on the wall for decoration.

Tuesday, May 5, 2009

Buttonhole stitch

The buttonhole stitch is the most appropriate stitch for sewing buttonholes. It is used to prevent fraying of the buttonhole. Since it has a small half-knot at the top of each stitch it is also less likely to unravel if the thread is broken, something that is likely to happen eventually, from use. To get the most strength, it is important to wax the thread before use. The waxing will strengthen the thread and prevent twisting while sewing the buttonhole, the buttonhole stitch in any direction. Following is the procedure of doing buttonhole stitch. Hold the thread along the top edge of the material, with the end pointing in the direction you are going to sew. Make a loop with the top of the loop pointing upward. Inserting the needle through the loop, then into the fabric from the wrong side and then through the large loop left on the right side of the material. Tighten your stitch, keeping the purl on top by see-sawing the thread and using your fingernail. The additional stitches are created by arching the thread over the right side opening of the buttonhole in the direction you are sewing, then looping down and back around in the opposite direction your are sewing, through the loop at the top, then through the material from the wrong side about 1/16th of an inch from the last stitch, through the large loop on the right side and then tightening as before. Continue doing this all the way around the buttonhole until done that’s how the buttonhole stitch embroidery is done.

Monday, May 4, 2009

Back stitch

back stitchBack stitch

Back stitch is one of the straight stitches and is most often used as an “outlining stitch”, although it can also form the basis for other decorative stitches. Just likestem stitch, “outline stitch and “split stitch are a class of embroidery and sewing stitches in which individual stitches are made backward to the general direction of sewing. These stitches form lines and are most often used to outline shapes or to add fine detail to an embroidered picture. It is one of the main stitches used in black work.

Saturday, May 2, 2009

Chain Stitch

Chain stitch is a sewing and embroidery technique in which a series of looped stitches form the pattern which looked similar to that to metal chain. Chain stitch is an ancient technique which is an example of surviving Chinese chain stitch embroidery worked in silk thread has been dated to the Warring States period (5th to 3rd century BC). Handmade chain stitch embroidery does not require that the needle pass through more than one layer of fabric. For this reason the stitch is an effective surface embellishment near seams on finished fabric. Because chain stitches can form flowing, curved lines, they are used in many surface embroidery styles that look like a "drawing" in thread. Chain stitches are also used in making tambour lace, need lelace, macramé and crochet. Chain stitch is also a technique used to shorten rope or cable for storage or while in use. Following the procedure for doing chain stitch “Bring the thread up at the top of the line and hold it down with the left thumb. Insert the needle where it last emerged and bring the point out a short distance away. Pull the thread through, keeping the working thread under the needle point”.