Tuesday, May 26, 2009

Roll to roll embroidery machines


Following are the features of roll to roll embroidery machines:

  • Internal battery backup and origin reference allow you to restart quickly and accurately even after a power failure.
  • This embroidery machines has Automatic thread break detector.
  • Variable sewing speed from 200 to 600 stitches per minute and can be adjusted to suit each individual application.
  • Perimeter trace allows you to trace the outline of a design to ensure proper placement of design.
  • Digitally float to any stitch in a design.
  • Visual pattern preview.
  • The Head of this embroidery machines contains 5 or 9 needles.
  • This embroidery machines has super quiet operation, means it produces very minimal sound while running.
  • Thread clamps hold threads in place to prevent pull outs.
  • This embroidery machines has the quality of Automatic color change.
  • Automatic thread trimmers.
  • It has the Built-in 3.5" disk drive.
  • 261,000 stitch capacity in 10 patterns. Expandable up to 696,000 stitches.
  • Automatic speed control ensures optimum stitch quality.
  • Ability to update software from disk.
  • Backup disk of all patterns stored in memory can easily be created or restored with one simple command.
  • Function List allows you to quickly and easily change color sequence in one screen.

Monday, May 25, 2009

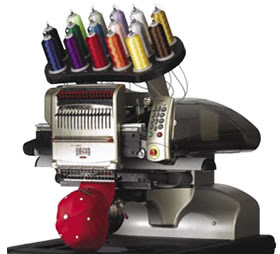
Cylinder type embroidery machines

Embroidery machine

Following are the features of the cylinder type embroidery machines.

  • This embroidery machine contains 12 or 15 needles.
  • Thread clamps holds thread in place to prevent pull outs.
  • Automatic color change.
  • Adjustable table allows quick and easy conversion between finished cap, tubular and flat goods.
  • Variable sewing speeds of up to 1,000 stitches per minute. Can be adjusted to suit each individual application.
  • Automatic return to origin.
  • Digitally float to any stitch in a design.
  • Outline trace allows you to trace the outline of a design to ensure proper placement of the design.
  • Automatic speed control ensures optimum stitch quality.
  • Ability to update software from CF card.
  • Backup disk of all patterns stored in memory can easily be created or restored with one simple command.
  • Function List allows you to quickly and easily change color sequence in one screen.
  • Built-in 3.5" disk drive.
  • Internal battery backup and origin reference allow you restart quickly and accurately even after a power failure.
  • 10 million stitch capacity in 30 patterns.
  • It also has CF Card slot.
  • Automatic thread break detector.

Sunday, May 24, 2009

Multi headed Embroidery Machine

Embroidery machine

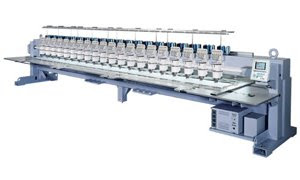
Following are the standard features of the multi headed embroidery machines

  • The pantograph achieves high-speed operation and reduced noise using the AC servo motor.
  • Powerful AC main motor, controlled by an inverter board, allows embroidery on thick fabric.
  • LCD display is easier to read in areas where temperatures fluctuate.
  • BOBBIN COUNTER
  • Based on stitch count the system prompts when the bobbin should be changed. The Bobbin Counter is set at a specific stitch count and will automatically stop the machine to change the bobbin when this stitch is reached.
  • This Embroidery Machines can run up to the Maximum speed of 1000RPM
  • This Embroidery Machines can also be attached to the LAN Connection and Networking.

Saturday, May 23, 2009

AMAYA XT professional embroidery machine

Embroidery machine

AMAYA XT professional embroidery machine is not an ordinary multi-head system, the multi-task capabilities can produce like no other multi-head on the market, it is the product of Melco industries. Now a days embroidery production demands are quite diverse. AMAYA XT’s multi-task abilities and connectivity capacity enables businesses to take full advantage of consumer demand. Following are the qualities of this embroidery machine.

  • The largest cap sewing field in the industry
  • Unique modular design
  • Precise thread tension with the Acti-Feed™ thread tension technology
  • Consistent speeds of up to 1500 stitches per minute irrelevant of machine configuration
  • Precise laser tracing eye
  • 16 Color backup system
  • Independent systems are not affected by single thread breaks like conventional embroidery machines which shut down production of all heads.

Friday, May 22, 2009

Melco Embroidery Systems

Melco Embroidery Systems building

Since 1972, Melco Embroidery Systems has been the industry leader of complete embroidery solutions for the home-based entrepreneurial and commercial markets. Having the motto that “We can help your embroidery become more productive and profitable”. They not only manufacture modular AMAYA embroidery machine but also provide DesignShop digitizing software, embroidery components and supplies, technical support; training and leasing for embroidery businesses of every size. Melco is the only company that engineers and manufactures embroidery equipment and software in the United States. Melco is a wholly owned subsidiary of “Saurer Limited” which is the world's largest textile machine manufacturer with 150 years of expertise, based in Switzerland. Since its beginning Melco has developed a legacy for constant innovation. Melco is the only company in the industry that offers a total embroidery solution under one roof.

Thursday, May 21, 2009

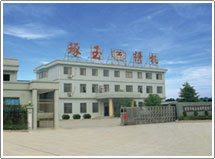
Zhuji Zhuoyu Inc.

Zhuji Zhuoyu Inc. building who is embroidery machines manufacturer

They manufacture high-tech computer-controlled embroidery machines and are located Zhuji City. Since being established, they have experienced constant growth and expansion and have been ceaselessly innovating and busy promoting the ZHUOYU brand and our corporate image. Because of their first class technology and equipment and their qualified employees ZHUOYU brand computer-controlled embroidery machines sell well both at home and overseas due to their unique design and reliable performance and the excellent services provide. Over the years they have taken on some very talented senior managers and technical personnel, who have assisted them to develop new products. They believe in sincerity and winning new customers by the quality of their goods and will continue to in this manner as they look to the international market to expand. Their excellent services and reasonable prices should be enough to encourage the customer to find out more by invite them to contact their company and begin talks on how they can best cooperate.

Wednesday, May 20, 2009

ZSK Stickmaschinen GmbH, Krefeld,

ZSK Stickmaschinen GmbH, Krefeld, embroidery machines manufacturer

ZSK Stickmaschinen GmbH, Krefeld, commenced production on February 1st 1984, and took over all the patents, rights, trademarks, inventories and finished machines for production of multi-head embroidery machines from former Zangs AG, Krefeld. By acquiring both the business assets and the excellent workforce of Zangs AG, ZSK safeguarded more than 100 years of expertise in textile machine construction and workmanship, including more than 30 years of experience in the embroidery machine sector. Worldwide there are more than 100 Agents and Distributors working for ZSK, all with well trained technicians on their staff to secure the highest level of customers' satisfaction. At the beginning of 1989 ZSK-USA was founded which covered on both the domestic and the Canadian markets for embroidery machines sector, and also covers local service and after-sales needs. In May 1995 ZSK opened its Asian distribution base in the German Center in Singapore. The other countries on the world market for embroidery machines are covered by agencies, qualified by their technical and marketing expertise; they are also responsible for their local after-sales service. This company has an exports account for approximately 95 % of total sales and embrace more than 100 countries all over the world, with more than 50 % of the ZSK turnover achieved outside of Europe and still increasing. ZSK is the largest European supplier and one of the leading manufacturers of embroidery machines worldwide.

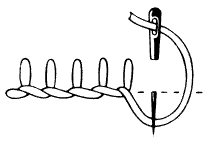
Procedure of doing buttonhole stitch embroidery .

procedure of doing buttonhole stitch.

Following is the procedure of doing buttonhole stitch. Hold the thread along the top edge of the material, with the end pointing in the direction you are going to sew. Make a loop with the top of the loop pointing upward. Inserting the needle through the loop, then into the fabric from the wrong side and then through the large loop left on the right side of the material. Tighten your stitch, keeping the purl on top by see-sawing the thread and using your fingernail. The additional stitches are created by arching the thread over the right side opening of the buttonhole in the direction you are sewing, then looping down and back around in the opposite direction your are sewing, through the loop at the top, then through the material from the wrong side about 1/16th of an inch from the last stitch, through the large loop on the right side and then tightening as before. Continue doing this all the way around the buttonhole until done that’s how the buttonhole stitch embroidery is done.

Tuesday, May 19, 2009

Procedure for looped embroidery stitches

procedure for looped embroidery stitches


Following is the procedure for looped embroidery stitches. Grasp the yarn with your left hand and, with your righprocedure for looped embroidery stitchest hand, procedure for looped embroidery stitcheswrap the yarn clockwise around your left index finger to make a loop. Insert the hook into the stitch so there are two loops on the hook. Rotate the hook clockwise in the opposite direction from the way you usually would so it goes over the yarn. Now pass the hook behind the yarn held by your left index finger. Catch both strands with the hook, and pull them both through the stitch. You should now have 3 loops on your hook then pull the strand through all loops on the hook. This is a more secured and slightly stiffer version of the traditional loop embroidery stitch.

SWF East, Inc

SWF East, Inc embroidery machines manufacturer

SWF East was founded in 1999 and is a leading distributor of high-quality embroidery equipment and digital garment printers. It’s headquarter is in Florida with offices throughout the Eastern United States and Puerto Rico. SWF East has quickly become a leader in the industry with its multi-disciplined and experienced staff and the SWF brand embroidery machines manufactured by SunStar Machine Company which was founded over 30 years ago with a goal to be the leader in quality industrial sewing and embroidery machines. The current line of SWF machines are a result of accumulated techniques and skills that have brought and will continue to bring SunStar and SWF East, Inc. many years of success. Over the years the company has achieved many prestigious awards and prizes making it one of the leading companies in the Republic of South Korea.

Monday, May 18, 2009

Tajima Industries Ltd.

Tajima Industries Ltd.embroidery machines manufacturer

Tajima Industries Ltd. broke into the embroidery industry in 1964 with the development of the embroidery machine. As until that time embroidery had been performed only by highly trained craftsmen. In 1994 Technical Center was established to undertake several tasks to design and develop of new products, technical guidance and after-sale services. In recent years, many developing teams have been organized to design and develop "Operator-friendly" machines with low vibration and super-low noise. They have established our distributors throughout the world; 3 in Japan and about 70 overseas. In order to promote after-sale-services for customers, they also organize periodical technical training and always try to improve technical service level. They started Mass production of embroidery machines started in May 2006 and they are producing more than 3,000 types of embroidery machines with 1 to 56 heads.

Sunday, May 17, 2009

Barudan Co., Ltd,

Barudan Co., Ltd, embroidery machines manufacturer

Barudan is one of the leading embroidery machinery manufactures of the world. In order to cater to the worldwide demand of "Barudan", companies over the globe have been set up to meet the need of our customers over the last 4 decades. It all started in 1962, when Mr. Yoshio Shibata who was the founder of Barudan Co., Ltd, introduced the first embroidery machine to the Japanese market. Since then, many updates and technological jumps had been made in both machine design and performances have been done. For instance, in 1972, Barudan developed the first jump system that enabled a significant increase in stitch length to be sewn. In that year company’s motto was development and sale of embroidery machines with automatic color change system. In 1977, Barudan developed the world's first multi-head computerized high-speed embroidery machine. In 1981, we produced the first monogram machine that allows Chinese and Japanese characters to be sewn. The decade of the 80s was mainly dedicated to the development of computerized machine functions. In 1996, Barudan developed an ultra high-speed embroidery machine of 1,200 revolutions per minute ("rpm").

Saturday, May 16, 2009

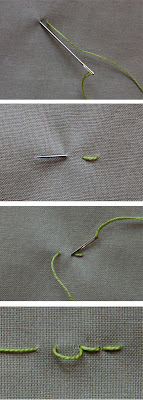
Procedure of doing chain stitch embroidery

Procedure of doing chain stitch embroidery

Following is the procedure of doing chain stitch.embroidery. Bring the threaded needle from the back side of the fabric to the front of the fabric. Reinsert the needle into the top side of the fabric where it came out of the fabric, pointing out the back side of the fabric. Bring the needle point back up through the right side of the fabric a short distance from where the needle went into the fabric. The distance is a variable which depends on the look you are trying to create. Wrap the thread around the point of the needle as shown in the photo, so that the needle will come through a loop of thread. Pull the needle through the fabric and loop, maintaining the thread loop by not pulling the thread overly tight. To continue chain stitching, insert the needle where it came out of the fabric, pointing down to the wrong side of the fabric. Bring the point of the needle back out of the fabric the same distance a you did the first stitch. Loop the thread around the needle point. Pull the needle all the way through the fabric, maintaining the loop by not pulling the thread too tightly. Repeat until you have sewn the desired amount of chain stitches.

Friday, May 15, 2009

Procedure of doing cross stitch embroidery

procedure of doing cross stitch embroidery

Following is the procedure of doing cross stitch embroidery, bring the needle through on the lower right and take it through to the back one block up and one block to the left, bringing it through to the front again one block down to form a half cross. Continue in this way to the end of the row and then complete the upper section of the cross. Cross stitch can be worked from right to left or from left to right, but it is important that the upper half of each cross lies in one direction.

Thursday, May 14, 2009

Procedure of doing back stitch embroidery

 back stitch embroidery

Following is the procedure of doing back stitch. Bring the needle and thread from the back to the front of the fabric. Put the needle down through the fabric about 1/8-inch away from where you started (For right-handers, it may feel more natural to move to the left; left-handers may prefer the right).Bring the needle up approximately 1/8-inch away from where you went down. Pull the thread through. Put the needle back down in the same spot you did before, taking a backstitch.

Wednesday, May 13, 2009

Procedute of doing Smocking Stitch embroidery

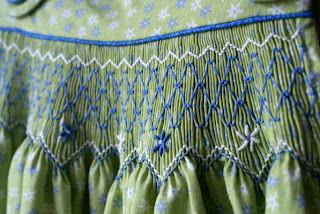
In this technique of embroidery it is essential to gathering threads which lay the pleats perfectly straight, and to regulate the distance of the stitches one from the other accurately. The whole beauty of the work depends upon the evenness of the gathering. One can buy a sheet of impression paper with dots to indicate the distance between the stitches and the gathering threads but with patience one can manage very well with a tape measure, using a pencil on white cloth, or chalk on silk a Smocking Stitch embroiderynd woolen fabrics. The most difficult thing while doing the Smocking stitch embroidery is how to start it or in other word how to knot the first stitch and the solution to that to hold your needle parallel.  Smocking Stitch embroidery Smocking Stitch embroidery Smocking Stitch embroidery

Tuesday, May 12, 2009

Looped stiitch


Looped embroidery Stitches are also called "Pile embroidery Stitches”. These embroidery stitches create a texture which gives the 3-D look. The mound surface is created by the loops contained in the stitches. Some stitches remain with the loops intact and some require the loops be cut. Usually looped embroidery stitches are generally used in rug making and they may also be used in any needlepoint project that requires a 3-D or mound look. Some of the more interesting looped embroidery stitches include the loop stitch, the shell stitch and the velvet stitch.

Monday, May 11, 2009

Sicilian drawn thread stitch

Sicilian drawn-thread embroidery stitch

Sicilian drawn-thread embroidery stitch is one of the earliest and most ancient forms of open work embroidery came from the countries having borders with the Mediterranean Sea. Later this dawn work was introduced into Greece, Italy, Russia, Germany and Spain under the names PUNTO TIRATO (threads drawn one way) and PUNTO TAGLIATO (threads drawn both ways). Towards the end of the 16th century, the art of embroidering on linen was taken up in England by members of the Royal Household, who being clever at lace making, introduced lace stitches intermingled with drawn thread work to enrich their clothes and household linen. Elizabethan portraits show spectacular ruffs decorated with drawn thread work. The embroidery of the 16th Century had such a large number of threads cut and withdrawn that they were strengthened and decorated with darning and needle weaving, and with threads added diagonally and in curves which were held in place with bars. In 19th and early 20th centuries an enormous quantity of drawn thread work was produced on linen and cotton to decorate bed and table linen. This embroidery stitch is used for the decoration of lingerie, handkerchiefs, sheets, tray cloths and tea cloths, towels, nightdress cases and other household fundamentals.

Saturday, May 9, 2009

Palestrina Stitch

The Palestrina embroidery stitch is also known by many other names just like tied coral stitch, Smyrna stitch, double knot stitch. The Palestrina is a common embroidery pattern observed in Italy and many Italian types of embroidery are composed of the Palestrina stitch. The Palestrina embroidery stitch is characterized by a kind of knotted line formed by the thread and it is significant to note that the use of this stitching technique is not confined to even-weave fabrics but on the contrary it can be used on a variety of fabrics. The designs of the Palestrina embroidery stitch work are in the form of a line and are commonly used for bordering purposes. The knotted line effect is the most important and striking feature of the Palestrina embroidery stitch and while threads of different kinds and quality can be used, the best option is to use the pearl cotton threads which are twisted threads and are able to produce the knotted effect perfectly. It is interesting to notice that all the knots need to be placed at equal distances from each other and from a distance they seem to be arranged in a linear fashion following a curvature. There can be two major kinds of Palestrina embroidery stitch. If the lines above the knots enlarge upwards it is known as Long Armed Palestrina embroidery stitch while if the lines below the knot moves downwards it is called Long Legged Palestrina embroidery stitch.

Friday, May 8, 2009

Smocking Stitch

Smocking Stitch

Smocking stitch is an embroidery technique used to gather fabric so that it can stretch. Before the introduction of elastic, smocking was commonly used in cuffs, bodices, and necklines in garments where buttons were undesirable. Smocking developed in England and has been practiced since the Middle Ages and is unusual among embroidery methods in that it was often worn by laborers. Other major embroidery styles are purely decorative and represented status symbols. Smocking was practical for garments to be both form fitting and flexible, hence its name derives from smock a farmer's work shirt. Smocking was used most extensively in the eighteenth and nineteenth centuries.

Thursday, May 7, 2009

Cross Stitch

cross stitch

Cross stitch is one of the oldest forms of embroidery and can be found all over the world. Many folk museums show examples of clothing decorated with cross stitch, especially from continental Europe and Asia. Two-dimensional cross stitch in floral and geometric patterns, usually worked in black and red cotton floss on linen, is characteristic of folk embroidery in Eastern and Central Europe. Multi colored, shaded, painting like patterns as we know them today are a recent development, deriving from similar shaded patterns of Berlin wool work of the mid-nineteenth century. Traditionally, cross stitch was used to embellish items like dishcloths, household linens, and doilies (only a small portion of which would actually be embroidered, such as a border). Although there are many embroiders who still employ it in this fashion, especially in Europe, it is now increasingly popular to simply embroider pieces of fabric and hang them on the wall for decoration.